
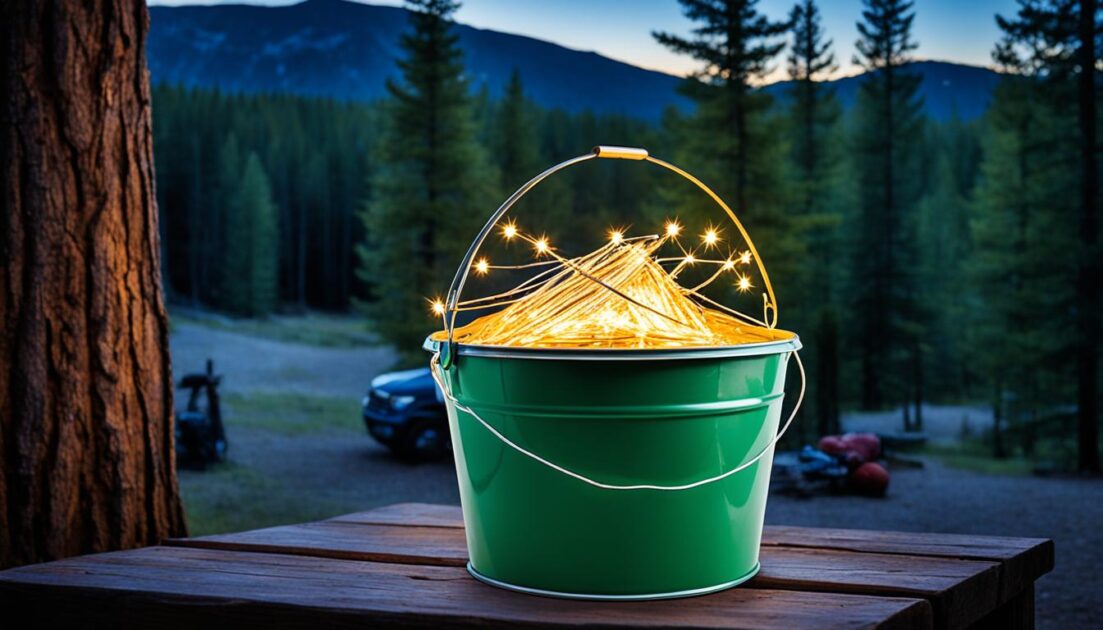
Looking for a practical and cost-effective lighting solution for your camping adventures? In this DIY guide, I’ll show you how to make your own camping bucket light. Whether you’re planning a camping trip or just need some extra outdoor lighting, this project is perfect for illuminating your space. With step-by-step instructions and easy-to-find materials, you can create a customized camping bucket light that suits your needs and style.
To get started, you’ll need a few basic materials such as a plastic bucket with a lid, submersible lights, permanent vinyl, Cricut tools, and the Allspice Alternates Regular font. Don’t worry if you’re unfamiliar with some of these items – I’ll explain everything in detail as we go along.
Once you have your materials ready, we’ll dive into the step-by-step instructions for creating your camping bucket light. From downloading the design file to transferring the vinyl onto the bucket, each step is carefully laid out to ensure success. And don’t worry if you’re not an experienced crafter – this project is beginner-friendly and doesn’t require any special skills.
Not only will making your own camping bucket light save you money, but it also allows you to unleash your creativity. You can customize the design and decoration to suit your style and preferences. Additionally, the submersible lights provide bright and reliable illumination, making your campsite or outdoor area feel cozy and inviting.
But wait, there’s more! In addition to the basic camping bucket light, I’ll also introduce you to alternative versions – a corded camping bucket light for brighter illumination and a wireless camping bucket light that’s even easier to make. You’ll have options to suit different needs and preferences.
Ready to get started? Check out the step-by-step instructions, safety considerations, and additional tips and ideas in the upcoming sections. Get ready to craft your own camping bucket light and enjoy a bright and adventurous camping experience.
Key Takeaways:
- Create your own camping bucket light with this DIY guide
- Gather basic materials like a plastic bucket, submersible lights, and vinyl
- Follow step-by-step instructions for cutting, transferring, and adding the lights
- Customize your design and decoration to match your style
- Explore alternative versions like corded and wireless camping bucket lights
Materials Needed for Making a Camping Bucket Light
To make a camping bucket light, you will need the following materials:
- A plastic bucket with a lid: This will serve as the base for your camping bucket light. Make sure the bucket is sturdy and waterproof.
- Submersible lights: These lights are designed to be submerged in water, making them perfect for creating a safe and waterproof lighting solution. Choose lights with a suitable brightness for your needs.
- Permanent vinyl: This material will be used to decorate your camping bucket light. Select colors and patterns that match your personal style and outdoor aesthetic.
- Cricut Standard Grip Transfer Tape: This tool will help you transfer your vinyl designs onto the bucket surface. It ensures precise placement and easy application.
- Cricut Weeding Tool: Use this tool to remove excess vinyl and fine-tune your designs. It allows you to create crisp and clean shapes on your bucket.
- Painter’s Tape: This tape is useful for masking off areas of the bucket that you don’t want to decorate. It helps you achieve clean lines and prevent any unwanted paint or vinyl transfer.
- Allspice Alternates Regular font: This font adds a unique touch to your camping bucket light design. It can be downloaded and installed on your computer for use with design software.
Example Table:
| Materials | Usage |
|---|---|
| Plastic bucket with a lid | Serves as the base for the camping bucket light |
| Submersible lights | Provides the light source for the camping bucket light |
| Permanent vinyl | Decorates the camping bucket light |
| Cricut Standard Grip Transfer Tape | Transfers vinyl designs onto the bucket |
| Cricut Weeding Tool | Removes excess vinyl and fine-tunes designs |
| Painter’s Tape | Masks off areas for clean and precise decorating |
| Allspice Alternates Regular font | Adds a unique touch to the design |
These materials are easily accessible and will provide you with everything you need to create your own personalized camping bucket light.

Step-by-Step Instructions for Making a Camping Bucket Light
Follow these step-by-step instructions to make your own camping bucket light. First, gather all the materials mentioned in the previous section. Then, download the Camping Light Bucket SVG design file from the free resource library mentioned in the first source. Once you have the design file, prepare your vinyl design for cutting by ungrouping the elements and deciding on the size.
Cut the design using a Cricut cutting machine and transfer the design onto the bucket using transfer tape. Finally, add the submersible lights to the bucket for illumination. These detailed instructions will guide you through the entire process of creating a camping bucket light.

With the materials gathered and the design ready, it’s time to start creating your camping bucket light. Follow these steps:
- Start by cleaning the plastic bucket and lid to ensure they are free from dirt and debris.
- Place the bucket on a flat surface, and using painter’s tape, mark the area where you want to apply the vinyl design.
- Prepare your cutting machine. Load the vinyl onto the cutting mat and set the machine to the appropriate settings for your vinyl and machine model.
- Upload the Camping Light Bucket SVG design file into the cutting software, and adjust the size and orientation according to your preferences.
- Once everything is set, send the design to the cutting machine and let it work its magic.
- Once the cutting is complete, carefully remove the excess vinyl from the cutting mat using the Cricut weeding tool.
- Apply transfer tape to the top of the vinyl design, ensuring it covers all the cut-out elements.
- Peel off the backing of the vinyl, exposing the adhesive side.
- Align the vinyl design with the marked area on the bucket, and slowly press it onto the bucket’s surface using a smoother tool.
- Gently peel off the transfer tape, leaving the vinyl design on the bucket.
- Now it’s time to add the submersible lights. Place them inside the bucket, ensuring they are evenly distributed and facing upwards.
- Close the lid of the bucket securely to keep the submersible lights in place.
- Turn on the lights, and enjoy the warm, ambient glow of your homemade camping bucket light.
With these step-by-step instructions, you’ll be able to create your own camping bucket light in no time. Get creative with the design, adapt it to your outdoor space, and bask in the cozy glow it provides during your camping adventures.
Benefits of a Camping Bucket Light
Making your own camping bucket light has several benefits. First, it is a cost-effective alternative to buying pre-made camping lights. By utilizing materials you may already have or can easily obtain, you can save money while still achieving the desired lighting solution for your outdoor adventures. Additionally, building your own camping bucket light allows you to customize the design and decoration to suit your personal style and preferences. Whether you prefer a rustic look or a modern aesthetic, you have the freedom to create a camping bucket light that reflects your unique taste.
Another advantage of a homemade camping bucket light is the reliable illumination it provides. With the use of submersible lights, you can enjoy bright and efficient lighting at your campsite or any outdoor area. These lights are designed to withstand outdoor conditions, ensuring durability and longevity.
Furthermore, a camping bucket light offers the added convenience of repurposing the bucket for storage when not in use as a light source. After your camping trip or outdoor event, you can simply remove the lights and utilize the bucket to store other essentials. This versatility makes a homemade camping bucket light a practical and functional choice for any outdoor enthusiast.

Additional Tips for Creating a Camping Bucket Light
- Consider using energy-efficient LED submersible lights for longer battery life.
- Add weatherproofing materials, such as silicone or weatherstripping, to ensure the bucket is sealed and protected from moisture.
- Experiment with different decorative elements, such as stencils or decals, to personalize your camping bucket light.
Alternative Versions of Camping Bucket Lights
In addition to the basic camping bucket light, there are alternative versions that you can make. These alternatives offer different options for creating your own camping bucket light.
Corded Camping Bucket Light
The first alternative is a corded camping bucket light, which requires electrical power and provides a brighter light source. To make a corded version, you will need to wire a light fixture to a male extension cord and attach it to the bucket. This allows you to have a steady and reliable source of illumination for your camping adventures.
Wireless Camping Bucket Light
The second alternative is a wireless camping bucket light, which uses batteries for power. This version is easier to make and does not require any electrical wiring. Simply attach a wireless LED light to the bucket lid, and you’ll have a portable and convenient lighting solution for your outdoor activities. It offers flexibility and ease of use, allowing you to move the bucket light around without restrictions.
Whether you choose the corded or wireless option, these alternative versions give you the opportunity to customize your camping bucket light to suit your specific needs. You can select different light fixtures or wireless LED lights to achieve the desired brightness level and create the perfect ambiance for your outdoor space.
To learn more about how to make a corded camping bucket light or a wireless camping bucket light, continue reading the following sections for step-by-step instructions on each version.
Additional Tips and Ideas for Camping Bucket Lights
Enhance your camping bucket light experience with these valuable tips and creative ideas. By incorporating these suggestions, you can take your DIY project to the next level and enjoy a truly unique lighting solution for your outdoor adventures.
Vibrant Vinyl Designs
Add a personal touch to your camping bucket light by using different colors or patterns of vinyl. Let your creativity shine through by creating unique designs that reflect your style and personality. Whether it’s a bold pattern or a subtle gradient, the vinyl decorations will give your camping bucket light a distinct and eye-catching look.
Securing Lights with Velcro
To keep the submersible lights securely in place inside the bucket, consider adding Velcro strips to the lid. This simple yet effective technique ensures that the lights stay in position, even during transport or when the bucket is tipped over. Enjoy the peace of mind of knowing that your lights are safely secured and ready to provide illumination.
Experiment with Different Placements
Don’t be afraid to get creative with the placement of the lights in your camping bucket. By experimenting with different arrangements, you can achieve various lighting effects and create a more dynamic ambiance. Whether you choose to concentrate the lights in the center or scatter them around the bucket, each configuration will bring its own unique charm to your outdoor setting.
Multi-Purpose Illumination
Your camping bucket light doesn’t have to be limited to just camping trips. Think outside the box and utilize it for other purposes, such as illuminating outdoor parties or lighting up your driveway. Its versatility makes it an excellent tool for enhancing any outdoor gathering or adding a touch of elegance to your home’s exterior. Let your imagination guide you in finding new and exciting ways to utilize your camping bucket light.
These additional tips and ideas will inspire you to get creative with your camping bucket light and make the most out of your DIY project. By incorporating unique vinyl designs, securing lights with Velcro, experimenting with different placements, and exploring multi-purpose illumination, you can enjoy a camping bucket light that goes beyond its traditional purpose. Let your imagination run wild and create a lighting solution that is not only functional but also visually stunning and versatile.
Safety Considerations for Camping Bucket Lights
While making and using a camping bucket light can be a fun and practical project, it’s important to prioritize safety. Here are some safety tips to keep in mind when using camping bucket lights:
- Choose the right type of lights: Always use submersible lights that are specifically designed for outdoor use and are waterproof. These lights are built to withstand the elements and provide safe illumination for your camping adventures.
- Follow electrical safety guidelines: If you choose to make a corded camping bucket light, it’s crucial to follow all electrical safety guidelines. Make sure to properly wire the light fixture to a male extension cord and ensure all connections are secure. If you’re not comfortable with electrical wiring, consider opting for a wireless camping bucket light instead.
- Monitor battery life or electrical power: Whether you’re using a battery-powered or corded camping bucket light, it’s essential to keep an eye on the battery life or electrical power source. Regularly check the battery levels and ensure that the power source is functioning properly to avoid any unexpected power outages.
- Avoid leaving the light unattended: Never leave the camping bucket light unattended, especially when it’s turned on. It’s important to be present and aware of the light’s operation to prevent any potential accidents or hazards.
- Keep away from flammable materials: When using the camping bucket light, make sure to keep it a safe distance away from any flammable materials such as tents, dry foliage, or other camping equipment. This will help prevent the risk of accidental fires or damage.
By following these safety considerations, you can enjoy a safe and enjoyable experience with your camping bucket light, providing reliable and well-lit surroundings for your outdoor activities.
Conclusion
Making your own camping bucket light is a rewarding DIY project that provides a practical and versatile lighting solution for your outdoor adventures. With the step-by-step instructions and tips mentioned in this guide, you can easily create your own customized camping bucket light. Whether you’re camping, hosting outdoor parties, or illuminating your garden, a homemade camping bucket light will add a touch of brightness and creativity to your outdoor space.
By following the detailed instructions, you can personalize your camping bucket light with different colors, patterns, and vinyl designs. The submersible lights provide bright and reliable illumination for your campsite, ensuring a well-lit and enjoyable experience. You can also explore alternative versions like corded or wireless camping bucket lights, offering different options to suit your preferences.
Remember to prioritize safety by following electrical guidelines for corded versions and using waterproof submersible lights. Keep an eye on the battery life or electrical power to avoid accidents, and never leave the camping bucket light unattended. With these precautions in mind, you can have a safe and adventurous camping experience.
Enjoy the process of making and using your camping bucket light, and let it illuminate your outdoor escapades. Whether you’re embarking on a camping trip or simply enhancing your outdoor space, your DIY camping bucket light will provide a bright and creative lighting solution to make your adventures even more memorable.
FAQ
What materials do I need to make a camping bucket light?
To make a camping bucket light, you will need a plastic bucket with a lid, submersible lights, permanent vinyl, Cricut Standard Grip Transfer Tape, Cricut Weeding Tool, Painter’s Tape, and the Allspice Alternates Regular font
Can you provide step-by-step instructions for making a camping bucket light?
Yes, here are the step-by-step instructions for making a camping bucket light:
What are the benefits of a camping bucket light?
There are several benefits of a camping bucket light, including cost-effectiveness, customization options, reliable illumination, and versatility
Are there alternative versions of camping bucket lights that I can make?
Yes, you can make a corded camping bucket light or a wireless camping bucket light as alternative versions
Do you have any additional tips and ideas for camping bucket lights?
Yes, here are some additional tips and ideas for camping bucket lights:
What safety considerations should I keep in mind when using a camping bucket light?
When using a camping bucket light, it’s important to follow electrical safety guidelines for corded versions, use only outdoor-rated and waterproof lights, monitor battery life or electrical power, and avoid leaving the light unattended or near flammable materials
Can you provide a conclusion for the DIY guide on how to make a camping bucket light?
Making your own camping bucket light is a rewarding DIY project that provides a practical and versatile lighting solution for your outdoor adventures. Enjoy the process of making and using your camping bucket light, and have a bright and adventurous camping experience.